Ribbon Wrangling

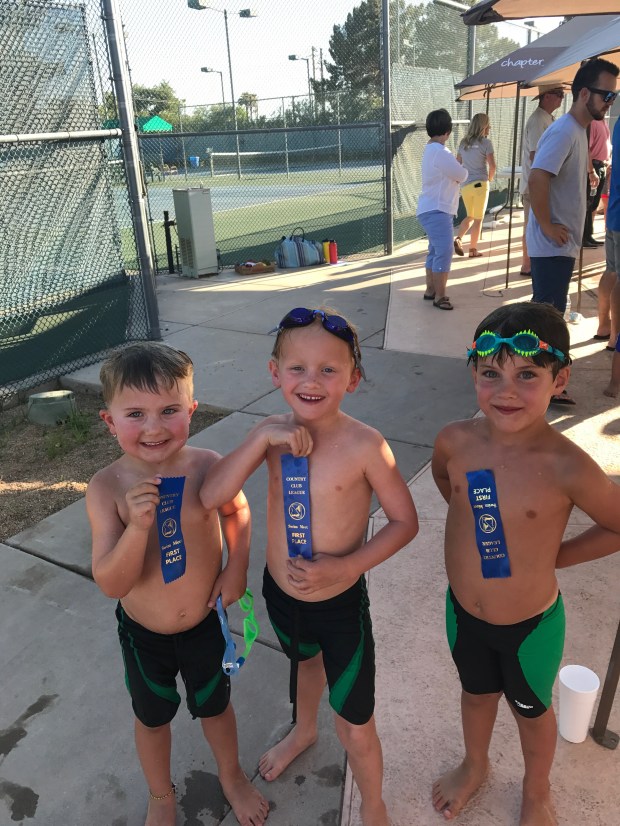
This swim team season has been the best yet! Having both kids on the team, happy and working hard was amazing.

5F23DE5A-C391-4FB6-8DAF-78CA4031080B

And this guy.

auggie swim

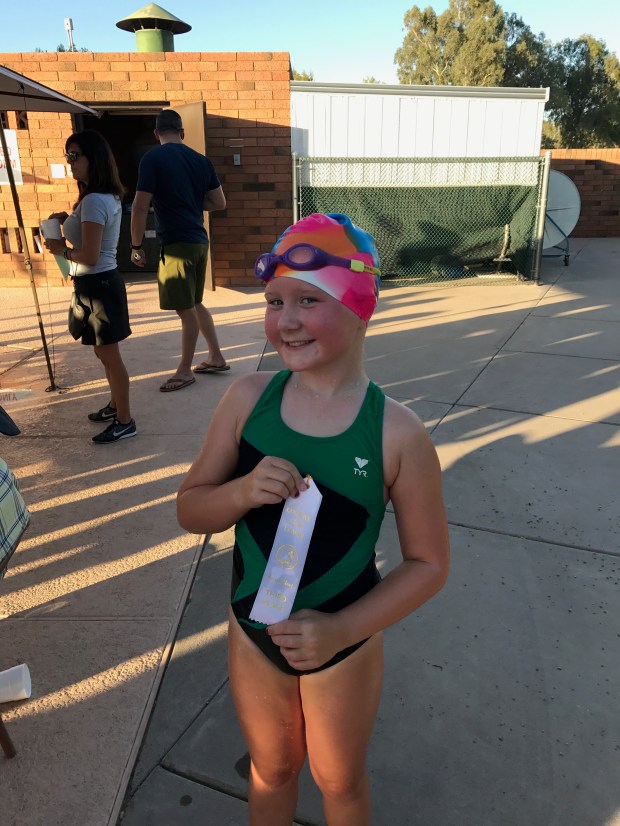
Youngest on the team by almost a full year and he crushed it! In his first meet, he got splashed big time during the back stroke warm up and got a serious case of butterflies. After a snack, observing other swimmers, pep talks from us, several other parents, his teammates and coaches, he reluctantly lined up to swim his heat. Swimming in the 6 and  Under category, he was 1 of 5 kids in the heat, two of which were 6 years old. When they handed him his 3rd place ribbon, his mind was blown. He did it! He walked around swinging the ribbon saying “oh this? It’s just my ribbon. It’s a 3rd place. No big”. It. Was. Amazing.

4DB1D77F-28AC-4792-8553-EA6BE7B723FD

He went on to swim the rest of the season in both individual and relay races and worked his little butt off to do it. He was crushed when he didn’t make the cut in the finals, but showed up in his uniform any way “just in case”. I love his hustle and can’t wait to see what he does when he’s the big kid in his group.

Big scoops, buddy. Biiiiigggg scoops!!

9FB1C5AD-3249-44BF-8454-17361C3F0D6C

Also, it appears that while he sometimes has some hesitations about swimming races, his confidence with the ladies has no issues…

EEC74D79-6BD5-4346-A9D3-B0FA34C8AE56

This girl. This girls pushes past the limitations that asthma puts on her and works hard to swim fast. If there were style points, she’d win every time. Her strokes are gorgeous. This season, she worked on trading some of her skill for speed and she crushed it. She made the cut for breaststroke in the finals and took home an 8th place medal. She was supremely disappointed. While I felt bad that she was mad, I was also a little excited to see her get some competitive fire. Once she figures it out, she’s going to be unstoppable!

CD2B448E-E7E3-47D6-90EF-187DD38DFD8D

C1D0D1A5-D076-4CA5-8D9B-4227B795C9FA

Now, what the heck do we do with all these ribbons?!

Two years ago I assembled B’s ribbons into a shadow box for her. It makes a great back drop on her shelves. We added in her medal this year too.

*one note – if you have multiple kids, save your sanity by marking the ribbons as they get them. The fights that broke out over sorting ribbons at the end of the season were legendary.

(as you can see, I got this gem on sale at Hobby Lobby)

779EE428-7407-44B5-B745-DEF32A98085E

I use a cool iron and press them from the backside to get all the wrinkles out without damaging the print. In addition to pinning them in, I also put in a little hot glue to make sure they don’t swing around.

C3B1B946-C68C-4C07-969F-E0DA41B1874E.JPG

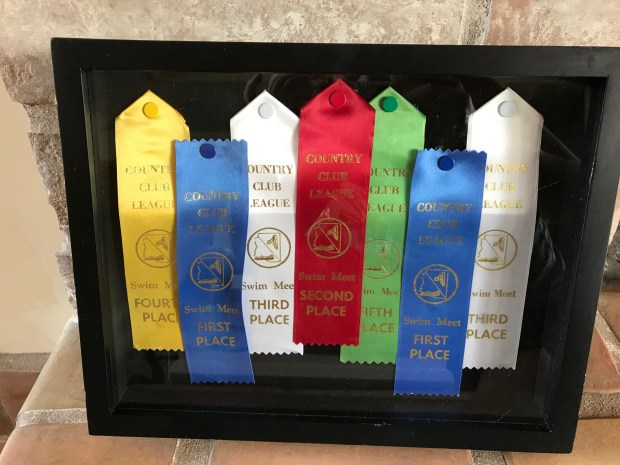
Voila! Start to finish, this is a 15 minute project. And a great display piece for all that hard work.

Beachy Memories

If your kids are like mine, they are always trying to keep every little rock, bucket of sand, broken shell and sea tumbled piece of trash that they find on the beach. Or in a creek. Or just walking down the road. Sure you can bring it home in the name of preserving your sanity, but then what do you do with it?!

I let everyone collect all the shells and sand that they want and then sometime things “blow” out of the car on the way home. What are you gonna do? With a paired down set of shells, rocks and sand, we create little jars. They are cheap at Michael’s and we try to get the same size each time – or at least the same style. Then we fill them, label them and put them on a shelf. Easy to dust and no beach memories on the floor!

And if glass scares you, grab a plastic jar instead and hot glue the lid on for a toddler / hands on friendly version.

Easy way to control the amount of crap that comes home and keep it in one place is to use a drink cup with lid. If you’re extra fancy, remember to pack some ziplock bags

3F8CB160-3C34-4377-9DBE-D30A2DF9360B

Our sand dollars were purple and hairy. We put them in a bleach bath over night and voila! White and smooth.

A1A70638-FC83-486E-AC8D-F80A1BE8A86B

Ta da! A sweet little mess free collection of our vacation!

BCA10381-3604-4480-A3F4-727AA069968E

Also works with creek rocks:

6F71A037-DCA6-4F36-A39A-7C00D4AB20FE


Hanging Memories

When we were first married, we had the skinniest, fake Christmas tree. It was this sad little thing, but it was in the budget. I added big strands of garland to it to beef it up and disguise the fact that we didn’t have many ornaments.

See what I mean? (And yes, that is snow outside! Kind of miss that. For like a second.)

699630045106

Every year since, I have bought an ornament with the year on it and popped our Christmas card picture into it. It’s so fun decorating the tree  and pulling out those sweet memories. The little faces, furry faces and younger faces  – all of them holding a little story of what life was like when they were created.

I’ve got the process down to a science now – as soon as I upload our Christmas card picture, I have one printed on ShutterFly in wallet size. Then I order the yearly ornament from Pottery Barn. I love the simplicity of the frame and how they are just a little different each year.

I think the part I love the most is when Auggie walks around the tree and exclaims “There’s me! There’s you, Baylor! There’s all of us!!”. It’s perfect.

And now that we have legit school pictures, I think we might need to start a new tradition with those…

So the Christmas tree this year is a bit better than that first tree…we had a very Griswold moment picking it out, getting it home and then getting it to stay upright. I still have sap on my hands.

IMG_4025

The one that started it all

IMG_4023

IMG_4021 (1)IMG_4020 (1)IMG_4024IMG_4022 (1)

And finally the newest addition

IMG_4043


Spooktackular Crafts

While looking for ideas for Auggie’s birthday party on Pinterest, I randomly came across the cutest Halloween craft. I’m a sucker for hand and footprint art. But I tend to leave those to the kid’s schools because paint on feet and hands gives me anxiety.

Despite my apprehension,  I was feeling ambitious so I took the picture of the craft and the kids to Michael’s to get our supplies. The kids were surprisingly good and happy to help gather up what we needed. They (generally) cooperated when it came to putting their hands and feet in the right place and they (sort of) listened when I told them not to touch the wet canvases. Overall? A win! And the end product came out pretty cute!

When we were getting ready to paint their feet, I asked Baylor how they do it at school – did they dip their hands into the paint or did the teachers brush it on? She concluded that most of the teachers would brush it on. Auggie then chimed in with “Mommy? Mommy? At mine school, when we are painting….they no let me put my hands in the paint.” I couldn’t stop laughing. He wanted so badly to contribute to the conversation.

IMG_3749

So their high arches and “sleepy” toes made for some funny prints, but I think they’re pretty cute! Want to give it a go? Here’s what you’ll need:

1 8oz bottle of multi-surface acrylic paint in Black and Orange

1 2oz bottle of multi-surface acrylic paint in Green and White

1 Spool of festive ribbon

Paint pens in Black and Orange. (I couldn’t find orange so I just used paint. It’s doable, but it takes a lot longer)

3 8×10 canvases

Glitter paint for decorating

Sponge brushes

Small paint brushes

Paper plates and news paper

Towels and small tub of soapy water

Start by painting the background on the three canvases. This is a great place to let the kids help. Ours took two coats with about 20 minutes of drying in between. Let dry overnight.

When you’re ready to do the hand and foot prints, on clean feet / hands, use a sponge brush to coat the whole bottom of the foot. You will need to use more paint than you think – really coat it. Then standing, have your kiddo put their foot on the canvas and hold still while you push down on each toe and the edges of the foot. Be careful not to let the foot slide around. When each foot or hand is done, dunk it in the soapy water (Baylor told me this little detail of school crafting AFTER we were done…). Let all hand and foot prints dry over night.

Start decorating! Add in wording, spider webs, glitter – whatever you want!  Hot glue the ribbon to the back, tie it in a bow and voila! Instant holiday memories. Have fun!

DIY Magnet Board

I think I might be on a roll.

Ok, I’m hoping I’m on a roll. I say this because I’ve just completed a project that I started before Auggie was born.

Yeah, that’d be 2 years for everyone doing the math.

Prior to moving home to AZ, our cute little hood in DC had curbside trash pick up. While out walking the dogs one afternoon, I saw our neighbors had thrown out a HUGE picture frame. Like huge. So I wrangled my hairy beasts and dumpster pile dove and took the frame home. I had visions of turning it into a damask fabric covered cork board that would hold hundreds of pictures in a casual yet totally planned way. It would look expensive and fabulous and I would looove to tell people that I made it for practically nothing!

Sadly because everything on HGTV always looks easier than it, my cork board didn’t come out quite right. It turns out that cork tiles are  little pricey. And I needed a ton. And even though I broke down and bought them, they didn’t have enough body to hold their shape on the fabric. And they were thin so when I finally got them to stay in place, the thumb tacks when right through the cork and into the wall. And when the door in the office was open and a breeze blew in, it blew down all my pictures because they weren’t really on the cork securely because the cork wasn’t really secure.

So after putting up with this for fourish years, I took it all apart with the idea that I would get sheet metal instead and use it as a magnet board.

I never learn my lesson.

It turns out that the metal they sell at Lowes and Home Depot is A. not magnetic and B. they won’t custom cut it for you. Then Auggie came and I got tired so my frame has been hanging on the wall of my office totally empty except for a few pictures Baylor taped to the wall because she thought it looked sad.

That is until this week. Well, last month. I decided that it was time to get it done. I had a vision of adding a few more frames to the wall and giving Bay a safe place to store her markers and crayons so that Auggie and Mason can’t get to them. And to be able to hang artwork and pictures that was breeze proof. Auggie and I took off to Hobby Lobby. I found their empty frames were half off. The fabric had a coupon and I found hooks on sale too. It was a sign. I’m not a fan of Hobby Lobby’s politics, but I can get behind a sale. Next I found a sheet metal company that would custom cut metal and it didn’t cost a fortune. And last night I was feeling ambitious so I got everything assembled – even with a few measurements that weren’t perfect, it came out pretty good!

photo 2 (39)

Here’s how I did it –

What you need:

Empty frame(s)

Fabric

Magnetic metal

Glue gun

Iron

Instructions:

1. Measure the inside of the frame (like where the glass would go). Go on the smaller side – you can always add fabric to fill it out but having to have a millimeter cut off would be annoying.

2. Call around to get a price on sheet metal. I used 20 gauge (because that’s what the guy said I should use) but I think it could have been a little thinner and have been just fine. Just make sure it’s magnetic. I also ordered mine unhemmed because it was cheaper and because I didn’t need a fancier edge.

3. Layout the metal on the fabric and line up the edges so the pattern of the fabric is straight. Cut leaving a 2-3 inch border to fold over.

4. Press the cut piece.

5. Laying the fabric pattern side down, line up the metal in the center again. Start folding over the edges and gluing into place in small sections (the metal is cold so the hot glue hardens really fast). Be sure that the metal is staying in place (I stood on mine) so the pattern is straight. Pull tightly so there are no creases.

6. Run a small amount of glue around the edge of the inside of the frame and place fabric and metal inside.

7. Hang on the wall and admire your work!

Other variations…paint the metal in bright color or with stripes. Paint with chalkboard paint (oooh). Create sections with paint and or fabric for each person in the family. Have the metal cut with two holes at the top to loop ribbon through as an alternative to the frame.

So now that my two year old project is done, I’m feeling motivated to tackle the ornament wreath I started making THREE years ago. Those assholes on Pinterest don’t tell you to paint the damn styrofoam ring before you start hot gluing ornaments to it. They also don’t tell you to use a much smaller ring than you think because it requires a ridiculous amount of ornaments and the thing is going to be 4 feet across and weigh 100 pounds if you use a big ring. I’m too far down the road to give up…so I’m going to go back and try to A. paint between the ornaments and B. add greenery where I can’t get paint. Wish me luck! Or wish me to have the guts to give up on the stupid thing. Either one works!

Peter the Carpenter

The carpenter is at it again…after visiting with friends who had made a wooden snowman family, PW was hooked. He couldn’t stop talking about, planning and designing his own snowman family. And once he start cutting, we didn’t see him for the rest of the weekend until it was done.

To be honest, I did not see his vision. It wasn’t until I was pulled from my nice warm bed to the cold patio to see his final creations that I got it. And they really did come out pretty cute!

I think Auggie’s top hat is my favorite!

photo 2 (37) photo 1 (33)

Oh How They Grow

I have been looking for a fun and different growth chart that the kiddos could share – the standard kind are A. too small (my kids are giants) and B. just boring. I found what I had been looking for on, duh, Pinterest. It was a large board made to look like a ruler and it was rediculously cute.

I have a deep desire to get some stuff checked off my to do list in an attempt to sleep well at night – (I’ve been having those dreams where you are headed to class, but you can’t find it. You get there and you’re not sure if you’re there on the right day and time)- so Peter bought and stained the board and then we tag teamed the decorations. I followed the instructions on 517 Decorations which were descriptive and simple. She had a cleaver way to get the numbers on the board and gave the font and size which made it a no brainer. It is hanging in their room and looks awesome! Using their check up records, I marked in purple and green their height from birth to now. The only down side is that I now have to measure Bay after every dinner where she eats green beans because we told her they would make her grow. There could be worse side effects….

marks


ruler


Pancake Update

The Dad’s Pancake Breakfast couldn’t have turned out better! All the hard work and stress paid off 10 fold; we raised nearly $1000 for the school and the dads, grandpas, uncles and kiddos had a really fun morning together. Here are the highlights:

Stephanie’s ADORABLE centerpieces

IMG_3268


Pin the Tie on the Daddy game

IMG_3271

IMG_3274


Make Your Own Tie


IMG_3308


A happy recipient of Make Your Own Tie


IMG_3292


These two were like a well oiled machine. They found every flat surface that could go on the stove and were flipping cakes at a rate of 20 every 2 minutes!


IMG_3319


PW working hard manning the serving table. Please note that Auggie is eating a paper napkin.

IMG_3288

Happy customers

IMG_3313

For being at the school at 630 am and flipping pancakes, refilling toppings and doing whatever else needed to be done – we didn’t look too shabby!

IMG_3326

A HUGE thank you to Ms. Stephanie D. I would work with you on any project, any time lady 🙂

DIY Cake Stands

It’s Scottsdale Moms Blog day! Check out my post on DIY cake stands. They are ridiculously easy to make and the final product looks like it was far more work.

Wouldn’t this make a lovely housewarming, wedding or birthday gift? Go and see how easy this is – you could crank out 10 of them this weekend!